Sipping information from the right glass
Customize your avionics and iPad to serve you best in flight
By Bruce Williams
The instrument panels in typical light aircraft today include at least some “glass”: perhaps a pair of Garmin G5s or an Aspen attitude indicator/horizontal situation indicator combination, plus, in an IFR aircraft, a GPS navigator with a moving map.

Even if you fly only VFR with a classic panel that just checks the boxes of FAR 91.205, your flight bag probably includes an EFB such as ForeFlight or Garmin Pilot.

Regardless of the number and types of gizmos in your panel, if you’re like most pilots, you probably haven’t changed the default settings for the data that your EFB and electronic gauges can display, and you may not be benefitting from the variety of information that they can make available during different phases of flight.
Consider a basic VFR panel and an EFB. The EFB is your chart, but when your only real-time indication of groundspeed is your progress relative to trucks on the interstate below, the standard data blocks at the bottom of the map view in ForeFlight are a valuable supplement. ForeFlight calls this row of information the “instrument panel.” If your EFB has an internal GPS or is connected to an ADS-B/GPS receiver, the default data blocks include your ground speed, the distance and course to the next waypoint, and other basic details. (Don’t confuse this ForeFlight “instrument panel,” described in section 11.21 in the ForeFlight Pilot’s Guide, with the synthetic vision feature, which can display a virtual six-pack of flight instruments. In Garmin Pilot, you can show and customize similar data boxes at the top of the map. In that app’s User’s Guide, see “Split-Screen.”)
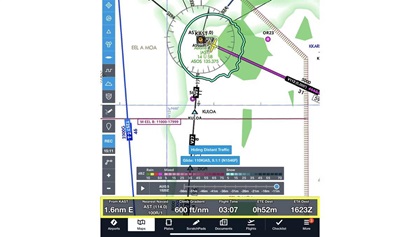
The default display of flight data in ForeFlight works well enough. But you can choose from an array of information to show, depending on your phase of flight and the other indicators available in your real instrument panel. For example, ForeFlight can provide the constantly updated distance and course to the nearest airport, useful for developing and maintaining general situational awareness and especially helpful in an emergency. Even if your aircraft does not have a VOR receiver, you can see similar details about the nearest navaid, based on your position and the known locations of VORs in the database. That information is often useful when talking to ATC or flight service.
Customizing the row of data on an EFB is simple. Touch the data block you want to change, and, from the list that appears, choose the information you prefer to show. Organize the blocks left to right by touching each item in turn and selecting the data you want to have in that position. To learn about all the possibilities, touch an item and scroll through the list, or check the list of options in the user’s guide for your app.

In ForeFlight, examples of especially useful choices include “Descent to Dest,” which shows the vertical speed needed to reach the destination elevation, and “Distance to Dest”—both handy for planning a VFR descent to the traffic pattern. Height AGL displays the GPS altitude above the highest terrain within a one-quarter-nautical-mile circle around your present location, valuable when setting up for ground-reference maneuvers, operating in the mountains, and as supplemental information when flying instrument approaches.
If your aircraft's instrument panel includes electronic displays and a GPS, much of the data in the standard boxes on an EFB is redundant. For example, even a compact PFD like a Garmin G5 typically shows your current ground speed, and the GPS in the avionics stack provides the current course and distance to the next fix. A system like the G1000 shows many more details. Replacing the default data on your EFB with information that isn’t already available in the panel reduces both head-down time and the button pushing required to maintain situational awareness.
In my Beechcraft Bonanza, equipped with a PFD/MFD combination similar to a G1000 system, I swap the ground speed and course blocks on the EFB for other data, such as a flight timer that starts automatically when the airplane reaches 60 knots during takeoff and the ETE to the destination. I also typically show the details about the nearest airport and navaid.
When I depart in instrument conditions, I exchange one of the blocks for a real-time display of my climb gradient to help me confirm that I’m meeting the obstacle-clearance requirements for a particular procedure.
In other words, I don’t have a default set of details for every flight. Instead, I change the data blocks based on the phase of flight, whether I’m operating VFR or IFR, and to complement the information available in the panel of the aircraft that I’m flying that day. Confirming the setup for a particular phase of flight is part of my pre-takeoff, cruise, and approach avionics flows and checklists.
You can customize the displays in your panel much as you do when using an EFB. Leaving aside the track-up versus north-up debate about the moving map (there is a correct answer), consider options that help you develop and maintain situational awareness.
For example, if you have a GPS like a GTN 750/650 with a moving map, decide how best to supplant the standard data blocks in the four corners of the screen. In my A36, I typically place a shortcut to the traffic page in the upper left corner; the current radial and distance from the VOR tuned in Nav 1 in the upper right; a 30-minute timer in the lower left, and a shortcut to the utilities page at the bottom right. I like having real-time position relative to nearby VORs always visible, and the other shortcuts make it easy to zoom in on traffic, remember to switch fuel tanks, and monitor my progress against the flight plan.
You probably have different preferences, and it’s easy to see all the possibilities and experiment with various configurations. On a GTN, after selecting Change User Fields from the menu, touch a data block, review the options, and make your choices based on what you can see elsewhere in the panel and other considerations, such as whether you’re operating VFR or IFR. To learn about all the options available with a GTN 650/750, see “User Fields” in the GTN Pilot’s Guide. If you fly with other Garmin PFDs, Aspens, or similar panel displays, check the user guides for those units.
The key is selecting the right “glass” for the information you need at a particular time. After all, you wouldn’t sip a Cabernet from a champagne flute, would you?
Bruce Williams is a flight instructor in Seattle, Washington.
Related Articles


