Savvy Maintenance
Opinion: Fire in the hole
Spark plugs start the fire, and need some TLC
We all know what aircraft spark plugs do: They accept high-voltage pulses from a magneto or electronic ignition unit and produce an electric spark inside the cylinder’s combustion chamber to ignite the air/fuel mixture and initiate a flame front. They do this about 20 times per second under hostile conditions of extreme temperature and pressure.

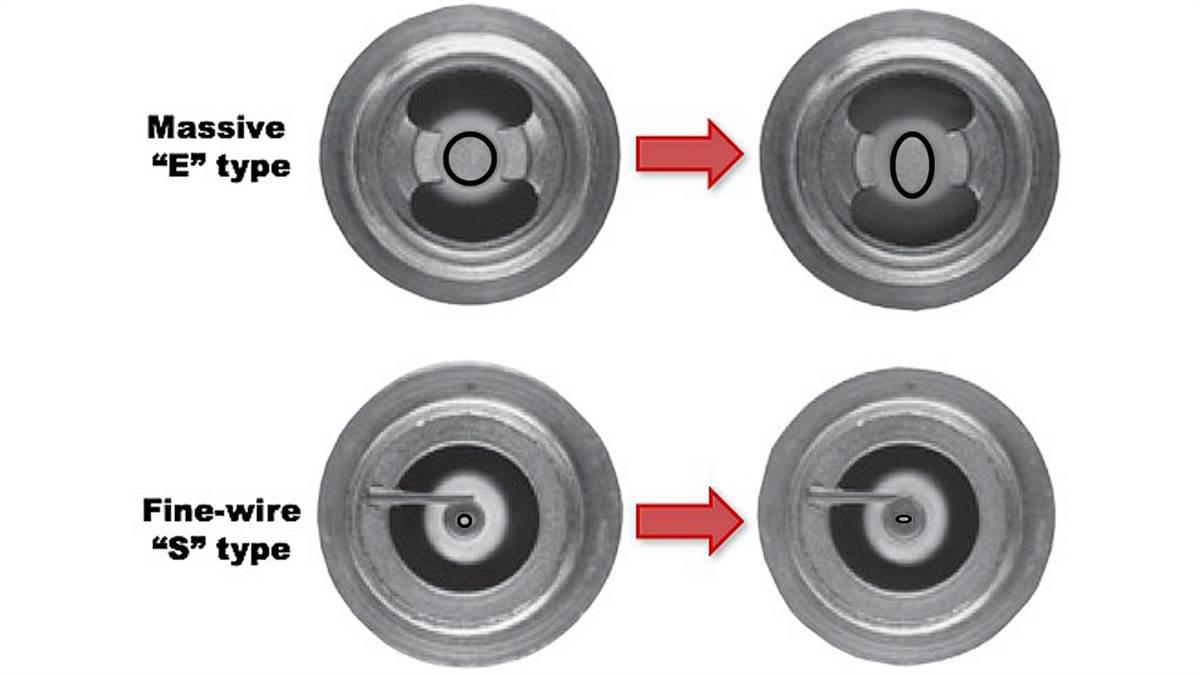
A spark plug has three coaxial components: a center electrode, a ceramic insulator, and steel barrel. The barrel is threaded on both ends; one end screws into the cylinder head and the other end mates with the ignition lead. The insulator is made from aluminum oxide ceramic to provide good strength, thermal conductivity, and dielectric properties. The center electrode comes in two flavors: massive and fine wire.
Wear and rotation
Whenever a spark jumps the gap between the spark plug’s center electrode and ground electrode, one of the electrodes loses a trace amount of metal because of ionization. This occurs 75,000 times per hour, and this loss of electrode metal gradually increases the gap, eventually eroding the electrode to the point that the plug becomes unserviceable.
Center electrodes start with a circular cross-section, and gradually become football-shaped in service because of erosion. When the short dimension reaches one-half the long dimension, it’s time to retire the plug. Similarly, when ground electrodes wear to half their original dimension, the plug should be retired.
Magnetos generate high-voltage pulses of alternating electrical polarity. When a spark plug is fired with a negative pulse, metal is lost from its center electrode; when fired with a positive pulse, metal is lost from the ground electrode(s). In a horizontally opposed engine with an even number of cylinders, half the plugs in the engine suffer center-electrode erosion while the other half suffer erosion of the ground electrode(s). By periodically rotating the plugs to positions of opposite polarity, electrode wear can be balanced and the plug’s useful life extended.
Preventive maintenance
Spark plugs are traditionally removed for cleaning, gapping, and rotation every 100 hours. However, I prefer to do regular in-flight lean-of-peak mag checks and perform spark plug maintenance only when these checks reveal less-than-stellar ignition performance; I find this on-condition approach results in reduced maintenance.
When it’s time to do preventive maintenance, I remove the plugs and put them in a spark plug tray so I won’t forget which plug came from which position in which cylinder. Then I inspect them for abnormal electrode wear; cracked nose core insulators; oil, carbon and lead deposits; or anything else that doesn’t look right.
If your plugs suffer from persistent fouling, the problem can usually be solved by using aggressively lean mixture settings, particularly during idle, taxi, and other ground operations. If fouling persists, the use of fine-wire (S-suffix) or projected-core (BY-suffix) plugs can help. For lead fouling, try adding Alcor TCP lead-scavenging additive to the fuel.
Next, the plugs are cleaned with a grit blaster to remove oil and carbon deposits, and lead globules are removed with a vibrator or pick. Then the electrode gaps are measured with a wire-type feeler gauge and adjusted as necessary using a spark plug gapping tool. Most plugs specify a gap of 0.016 to 0.021 inch; I like to keep mine gapped tight at 0.016 inch to provide maximum headroom for the gap to grow in service before re-gapping is necessary. (Such tight gapping also reduces the risk of high-altitude misfire in turbocharged airplanes like mine.)
Installing plugs
Whether you’re reinstalling plugs after cleaning and gapping or installing brand-new plugs, it’s crucial to use the right tools and procedures to ensure correct installation. When reinstalling plugs, remove and discard the used copper gaskets and install new ones, with the flat side facing the spark plug flange. (It’s possible to reuse the old, work-hardened copper gaskets if you anneal—soften—them by heating red-hot with a torch, but with new gaskets costing less than 50 cents apiece, I don’t think it’s worth the hassle.)
Carefully apply a small amount of aircraft spark plug thread lubricant/anti-seize (Champion 2812 or Tempest T556) to the second and third threads of the plug barrel. Apply sparingly, being extremely careful not to allow any of the thread lube to drip onto the electrodes or nose core insulator, otherwise the highly conductive lube might short out and ruin the plug.
Install the spark plug into its proper (rotated) location, ensuring the plug moves from bottom to top (or vice versa) and from positive to negative polarity (or vice versa). Start the lube-prepared end of the plug into the threaded cylinder head boss using only your fingers. If the plug resists being screwed into the head with finger pressure, you may have cross-threaded it—so remove it and try again. Never force it with a wrench because you could ruin the plug, or worse, the Heli-Coil insert in the cylinder head. In stubborn cases, you might want to use an aircraft spark plug thread chaser tool to clean up the Heli-Coil threads.
Once the plug has been screwed in finger-tight, use a special-purpose deep aircraft socket and a calibrated torque wrench to tighten the plug to its final torque. Continental calls for 25-30 foot-pounds of torque, while Lycoming calls for 30-35 foot-pounds. Never install aircraft spark plugs using the TFAR (that feels about right) method.
Prepare the ignition lead by wiping its contact spring and “cigarette” insulator with a lint-free rag moistened with methyl ethyl ketone or acetone. Insert the cigarette into the spark plug and screw on the cap finger-tight, then use a 7/8-inch wrench to tighten the cap while holding the lead with a 7/16-inch end wrench to prevent it from twisting. It’s extremely important not to overtighten the cap, because doing so will make it nearly impossible to remove next time. While most A&Ps use the TFAR method here, I prefer to use a torque wrench to tighten the ignition lead cap to the recommended 10 foot-pounds.
You can do this
Spark plug maintenance is a task aircraft owners are permitted to do without A&P supervision. It’s easy to do, not terribly time-consuming, and requires only a few inexpensive tools. It’s also a lovely excuse for you to get an up-close look at your engine on a regular basis—think of it as an advanced preflight inspection. Doing your own oil changes and spark plug maintenance is a great way to get involved with the maintenance of your aircraft.
If you choose to do it yourself, there are various rookie mistakes to avoid. I’ve already mentioned several: over-applying thread lube, overtightening ignition lead caps, allowing a lead to twist while tightening the cap, and reusing a work-hardened copper gasket. Another common mistake is dropping a spark plug during removal or installation. Never reuse a spark plug that has been dropped. Dropping an aviation spark plug just a few inches onto a hard surface can fracture its fragile nose core insulator. Even an invisible hairline insulator crack can lead to destructive preignition that could trash your engine and ruin your day.
Aircraft Spruce and Specialty Co. sells a nice spark plug maintenance kit for $120 that contains almost everything you need to maintain your spark plugs: spark plug tray, spark plug cleaner, feeler gauge, gap setting tool for massive-electrode plugs, aircraft spark plug socket, some copper gaskets, and a bottle of thread lubricant/anti-seize. The only additional thing you’ll need is a suitable torque wrench, which you can pick up for about $20 from Harbor Freight. The total investment of $140 will more than pay for itself the first time you do your own spark plug maintenance instead of paying your shop $100 an hour to do it.
Mike Busch is an A&P/IA. Email [email protected]


