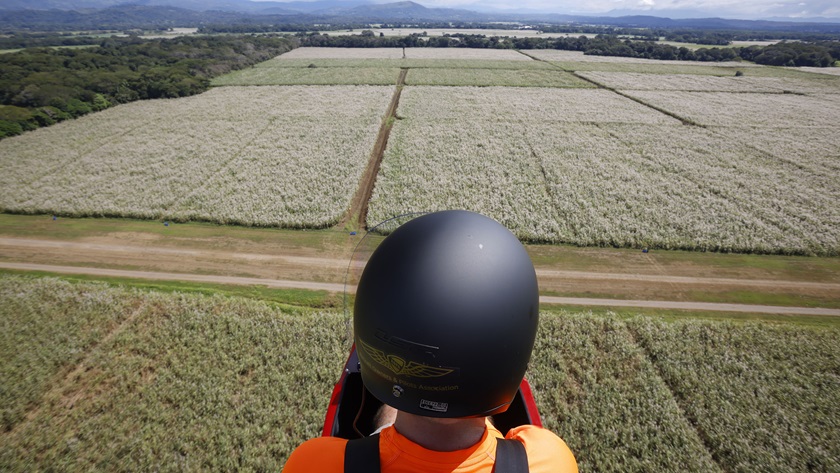
Gyro Hero: Takeoffs are a blast
Hold on because this will happen fast
Most aircraft fly more or less the same once you get them to altitude. Sure, there are differences in roll rate, how the aircraft is controlled, and how much control input is needed to make your desired state occur. But most everything has a stick or yoke that makes the aircraft turn left when you push left, turn right when you push right, pitch up when you pull back, and pitch down when you push forward. The big differences aren’t in the air so much as they are on the ground.
I gather from my limited time flying light jets that I wouldn’t have a problem keeping a Boeing in the air, provided it was already there. And I would have no hesitation giving someone the cyclic on a Robinson once we were at altitude, even if they’ve never flown a helicopter. But I have no doubt that I would fail miserably at taking off, landing, or even starting an airliner, just like I wouldn’t expect a person without rotorcraft experience would be able to do the same in the Robinson.
Takeoffs
Taking off in a gyro is quite complicated. Somewhat like a helicopter, the rotor begins turning when power is applied through a transmission. But a modern gyro’s “transmission” is a very simple system. Assuming the stick is full forward and the rotor brake is off, when a button on the stick is pushed, pressure is applied to a piston with a corresponding rod. As the piston contracts the rod pulls on a drive belt that tightens it, effectively connecting an upper and lower flywheel. The lower flywheel is connected to the engine, and the upper to a metal shaft that, through some basic gears, is connected to a drive pinion that extends into a ring gear on the rotor head. Think of it like a complex starter. The button is held while the engine power is increased, which increases rotor rpm. Once a set rotor rpm value is reached, the pilot lets go of the button, lets go of the hand brake, pulls the stick back, and applies full power. In addition to some other things like disengaging the rotor brake and centering the stick, there are about 11 steps from the time you line up for takeoff to the time you start rolling. And each one needs to be completed in the proper order, without a checklist. That’s an immense number of things to remember when you’re also focused on traffic, the wind, the radio, your passenger, and an emergency plan in case something goes wrong.
Incidentally, none of those 11 steps include sliding your heels to the floor in order to keep your toes off the brakes. It took me about 10 hours before I stopped instinctively moving my feet down when applying power. Since the wheel brakes are hand-operated, you leave your feet in the same position the entire flight, which I’ve come to like. That is, until I get into an airplane again and no doubt ride the brakes halfway down the runway.
Of all the steps that must occur during the sequence, pulling the stick back is arguably the most important. Because the rotor autorotates, air must flow up through it to create lift. When the stick is full forward, the disc is canted only slightly. If you were to forget to pull back, the rotor would never get the airflow necessary to fly.
This has happened many times, and usually ends in a heap of scrap. The pilot will remember he forgot to pull the stick back when he’s 50 or 100 yards down the runway, and will then pull the stick back while already rolling. Now the gyro has 30 or more knots of forward speed, plus the headwind component, and it all immediately flows up through the rotor. The best way to understand what happens next is to think of an umbrella. On a calm day you can tilt it forward, back, left, and right with no consequences. But as soon as the wind picks up, tilting it back will cause it to pitch up quickly as the increased surface area grabs all that air. If the wind is strong enough the umbrella is ripped out of your hand. The gyro is the same. The nose will quickly rise, and the gyro will leave the ground abruptly, usually hitting the tail.
But, assuming you’ve pulled the stick back before starting the takeoff roll, there’s a give and take where the gyro first rockets forward with the thrust of the engine, and then stabilizes as energy converts from forward speed to lift, and the rotor rpm begins to increase. When it is high enough, the nose pops off the ground, followed by the mains.
The nose pop is the hardest hands-on control portion of the takeoff. Sort of like a soft-field takeoff in an airplane, there’s a sweet spot between having it too high where you can hit the tail, and too low, where you don’t get enough speed through the rotor. The stick pressures are pretty high in this transition, and you often have to go from pulling all the way back to pushing forward in the matter of a few seconds.
One really fun aspect of this short takeoff run is that because the rotor is a big sail, you strongly and immediately feel the impact of stick position on lift. We know in an airplane that lift causes drag, but it’s virtually impossible to feel on the takeoff. Even if the stick stayed all the way back, most airplanes would eventually take off, if not soon settle back to the runway.
Move the stick a bit forward and back on a gyro and it feels like someone is tugging at the back of your shirt or throwing out a parachute. It’s not unlike finding the step on a seaplane takeoff, although I think the impact on the gyro is even more obvious.
After that it’s a matter of keeping it straight with the pedals and the stick into the wind. Because the disc is so big, a gyro can handle monster crosswinds that an airplane can’t. It gives the pilot a lot of confidence.
Landing
Landings aren’t significantly different, except that the power-off glide is horrible and the ground run is basically nil. There are a variety of landing techniques, and my instructor is correct in saying that the traditional airplane technique might be the worst. Holding it off until the lift runs out and the aircraft drops a few inches is certainly safe and results in decent landings. But not great ones. For that, it can help to fly it on with just a little bit of forward speed. Of course, in an airplane, that would translate to a much longer rollout, but gyros have a massive built-in drag device in the form of the rotor. Once on the ground, pulling back on the stick tilts the rotor back and stops the gyro in a matter of a few feet. It’s a remarkable thing to look at the sight picture as you would an airplane and think you’re going to land long, only to be able to put it down well short of even your most conservative assumption, and then stop in a few feet. There have been many times I expected to land halfway down the runway, only to then have to add power to make the approach end. Gyros aren’t vertical landing vehicles, but they’re as close as you can get without being in a helicopter.