Aircraft Maintenance: Inspecting your oil filter and screen
In this series, we have been reviewing the different ways that you can monitor the health of your aircraft's engine to protect your personal safety as well as your wallet. Since oil is the lifeblood of your engine, it's a great place to begin.

In my previous article, I explained how the different types of data we can glean from our engine can provide us with either objective data or trend data. Oil usage and oil analysis are mostly trend data, as what is considered normal can vary from engine to engine. However, inspecting the engine's oil screen or filter is objective data. It shows us the particles captured in the engine's filtration system that could otherwise have damaged the engine.
Following the oil pump, the oil flows into the second stage of filtration: the oil screen or filter. Many aircraft engines were originally designed with fine metal mesh oil screens limited to 25 hours between oil changes. However, oil filtration technology evolved away from oil screens well before most of us were born. The gold standard for decades now has been the spin-on oil filter. Oil filters provide many benefits, including better filtration and the ability to increase oil change intervals to 50 hours.
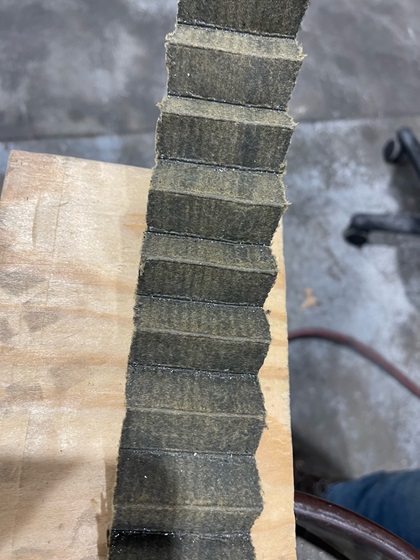
Examining an oil screen involves flushing it into a clean container to examine the contents caught by the screen. Examining an oil filter involves carefully cutting open the filter using special tools to avoid contaminating the filter media with particles from the can or tools. Regardless of what advice you may find on the forums, do not punch a hole in the filter case and blow shop air into the filter to reduce oil mess. This practice comes with far too many horror stories of causing more trouble than it's worth. You don't want to be chasing metal that was never in your engine to begin with.
Evaluating what you find in your oil screen and filter—and determining what to do about it—is where things get complicated. Neither Lycoming nor Continental provides a service bulletin titled "What to do when you find metal in your filter." However, both manufacturers do have service bulletins related to known issues in their engines that provide some very helpful guidance. For example, the guidance about using an external strainer comes directly from Continental Critical Service Bulletin CSB07-01A , "Connecting rod piston pin bushing inspection." In addition, Continental's outstanding "M-0" master service manual includes a thorough section titled "6-4.8.5.1. Identification of materials and possible sources." It's a great source for understanding how to identify metal pieces that you find and correlate them to sources within the engine.
 When it comes to how to quantify the metal you find and determine what to do next, it's best to look to Lycoming Service Instruction No. 1492D. This service instruction was issued to address piston pin plug wear inspection, but it includes thorough guidance on how to interpret metal in the filter and what actions to take. It is so thorough, in fact, that it can be reasonably used as guidance for Continental engines as well.
SI1492 is a detailed document that includes thresholds for both the size and quantity of the metal found. Most of the guidance is about noting the amount of "small (1/16-inch diameter or less) pieces," running the engine for reduced periods of time, and re-checking to see if the amount of metal is going down or up. Most importantly, according to this guidance, only the most dramatic amounts of metal warrant grounding the airplane or tearing down the engine. For example: If the metal found contains large pieces with diameters greater than one-sixteenth of an inch and totaling more than a quarter teaspoon in quantity, the aircraft should be grounded until the source of the metal is found. Finally, Lycoming guidance says there is no reason to tear down an engine based solely on the contents of the filter unless the quantity of metal in the filter exceeds a half teaspoon (which is a lot of metal).
Even if you do find large metal pieces in your filter, your first step should be to identify them to track down the source of the problem. Save the filter and send it off to a lab, such as Aviation Laboratories for detailed analysis. The lab can identify the specific contaminants and produce a report which you can then send to the engine manufacturer's tech support staff. This process can often pinpoint the source of them problem. In many cases, you may be able to fix the issue without tearing down the engine.
Metal in your oil filter can be alarming, but it pays to proceed carefully and logically. I recently encountered a number of thin, hair-like, brass-looking metal pieces in my filter. However, I had recently replaced a failing starter adapter that contained a brass gear. Based on the guidance and logical reasoning, I continued operating the engine with reduced oil change intervals. Lo and behold, subsequent filter inspections became clear again, with no further issues. The failed adapter and wear-in of the new adapter were the most likely source. My filter was just doing its job, clearing up a prior issue rather than signaling a new one. Until next time, I hope you and your families remain safe and healthy, and I wish you blue skies.