On instruments: Say goodbye to a stabilized approach
Practice makes perfect, but every circling approach has its curveballs

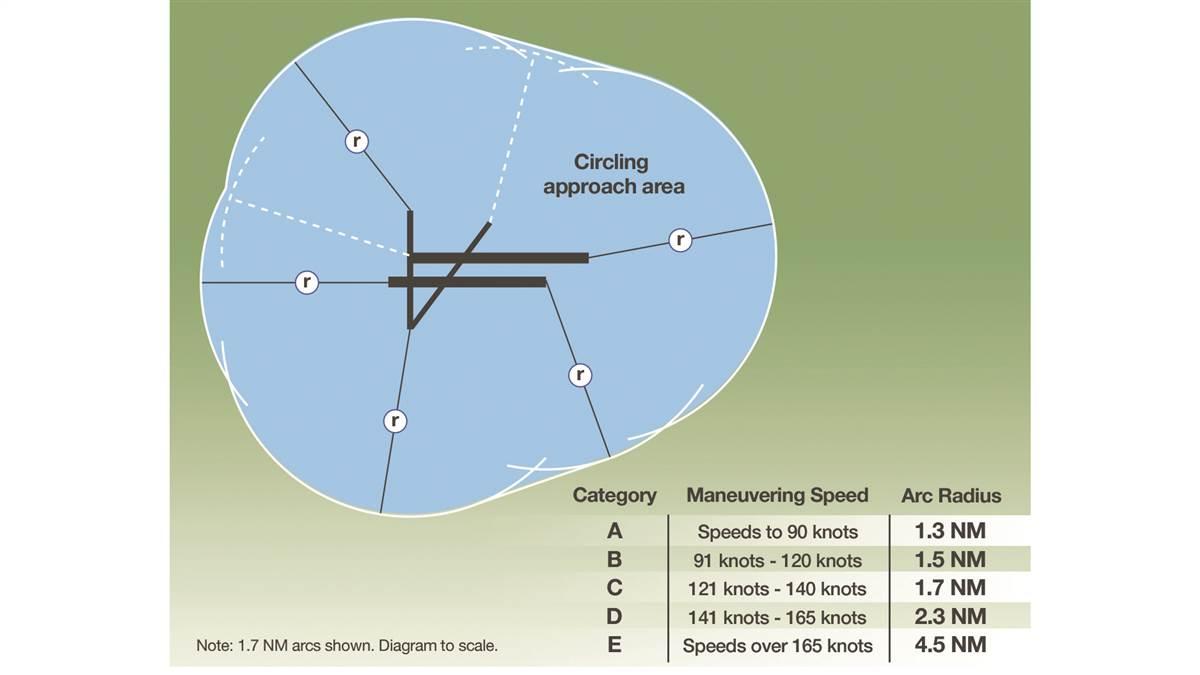
(Illustration by Charles Floyd)
I had another reminder recently, after taking a Daher TBM 930 recurrent course at Simcom Aviation Training Center’s Orlando location. As with any simulator-based training experience, there were loads of instrument approaches—many to minimums, others that ended in missed approaches—and some of them involved circle-to-land procedures. I also had plenty of practice flying stabilized approaches and precise touchdowns.
Simcom’s simulators are well known for the quality of their visual displays. The simulator cab doesn’t move, so when you’re “flying” the simulator you don’t get the rolling, pitching, yawing, and heaving that you’d experience in one of FlightSafety International’s or CAE’s full-motion simulators. That’s one of the reasons why Simcom’s simulators are classified as Level 6 Advanced Aviation Training Devices (AATDs), and not full-blown Level C or D simulators with full ranges of motion and credit for landings.
But what these simulators lack in motion is more than offset by their wrap-around visual displays. When the scenery moves the body plays right along, and there’s a definite psychosomatic sensation of movement. Another benefit is that the angle of view from the cockpit is so wide that it lets you see a runway from the downwind leg of a landing pattern. Breaking out on an instrument approach, the entire runway complex is spread out before you.
But back to circling approaches. Compared to ILS, LPV, and RNAV GPS approaches, they’re the oddball relatives with cranky dispositions. The heavily advertised stabilized approach? Forget about it. You won’t be landing straight-in to a runway. Instead, you’ll have to level off at higher minimums than those of a precision approach. That means adding power, flying a slightly higher airspeed, and resetting trim for a new configuration. Of course, this all assumes that you’ve broken out of instrument conditions by the time you reach circling minimums.
Then there will be a turn to circle to your chosen runway. During the turn you’ll have to remain within a prescribed circling radius defined by distance from the landing runway’s threshold. In practical terms, this means you’ll have to stay as close as 1.3 or 1.5 nm from the threshold (maybe a bit more if you’re using expanded circling minimums) while you maneuver to a position that puts you on your chosen runway’s extended centerline. That can be uncomfortably close. That’s for approach category A and B airplanes, respectively—which represent most owner-flown single-pilot airplanes.


Imagine banking while turning to stay within those margins. You’re slowed up but need to stay in a comparatively steep bank, one that puts you closer to stall speed. At the same time, you’ll be scanning the terrain ahead for the runway. Your attention is divided between the panel, outside visual cues, and going no lower than the published circling altitude. It may be turbulent, adding to the distractions. It may be night. It may be an unfamiliar airport. And a landing—or missed approach—is coming up in seconds. You’re on anything but a stabilized approach.
Circling in the sim
During my training at Simcom, I flew two circling approaches. Both were at night. One was at New York’s John F. Kennedy International, where I was vectored for the ILS Runway 4R, with a circle to land on Runway 31R. This is an approach that’s been approved for use in Simcom’s simulators, as well as those at FlightSafety International and CAE.
I broke out at 700 feet msl, so I was in the clear by the time I descended to the 640-foot circling minimum altitude. The visual display showed JFK and its runways, taxiways, terminals, and hangars in all their glory. It was a confusion of lights, but after sidestepping to the right I maneuvered to a heading that I figured would put me on a base leg for 31R. I could have used the TBM 930’s autopilot to fly the leg, but decided to hand-fly. After 10 seconds or so, I still hadn’t positively identified 31R—and this was in good visibility. I was flying at 120 knots, so time was of the essence.
Finally, I saw what looked like a horizontal illuminated structure—maybe the blast fence noted on the runway diagram—with runway alignment lights to its right. Next, it was quick—go to the landing flap setting, motor over to line up with the runway, slow to 85 knots, and fly to the threshold. To me, the risks on this particular approach were on the low side, even though it was night. The lights of the vast runway complex made it somewhat easy to locate the landing runway, there was adequate visibility, and the distance to the landing runway allowed a gradual turn onto the final approach.
The rules say that you can’t descend from the minimum descent altitude until you’re in a position to make a “normal” landing. I take that to mean that you’re lined up on the extended runway centerline, and there was plenty of room to get there with a fairly shallow bank. Last but not least, this approach had an expanded circling radius, so instead of being held to earlier, 1.5-nm radius limits, I had 1.7 nm of room to work with. An expanded circling radius is identified on approach plates in the minimums information blocks at the bottom of the page. You’ll see a white “C” embedded in a black box if there is expanded circling.
Another circling approach was vastly different. It was Truckee-Tahoe’s RNAV (GPS) Runway 20 approach with a circle to land on Runway 29. Truckee is in mountainous terrain, the approach path threads its way down a valley, and the minimums are higher. The expanded circling minimums are 7,120 feet (Category A) and 7,220 feet (Category B), which have you levelling off at 1,216 and 1,316 feet agl, respectively. There’s not much room to circle, and not much time to descend to the runway, either. That means steeper banks, so risk goes up. And it was night.
There have been many accidents at Truckee-Tahoe, and this approach had me flying one specific accident scenario involving that circle to Runway 29. The accident pilot could have flown down Runway 20, crossed the airport, and then made a left pattern to land on Runway 29. Instead, after breaking out he circled to the left to make a modified right base to Runway 29.
Flying the approach in the simulator, it was easy to see that this move ratcheted up the stress—and risk. From the left seat, you can’t easily see Runway 29, unless you dip the right wing. I did, and I could barely make out the runway. My first thought was that at 1,316 feet agl I was way too high to maneuver to a position from which I could make a normal landing. I thought of bending the airplane around, descending at the same time, and rolling out on final, but I figured that I’d land too long. I saw that fog covered the distant half of the runway. I’d be landing fast, into fog. Bad idea.
So I opted for a missed approach, hit the go-around button on the power lever, and the command bars popped up on the PFD to guide me through the procedure. Then it was a climbing right turn to 12,000 feet. For the accident pilot, things didn’t turn out so well. He stated he lost visual contact, became disoriented, then realized he was in a 70- to 80-degree left bank. By the time he levelled the wings the ground was directly in front of the airplane. He slid to a stop; he and three passengers suffered minor injuries. The NTSB listed the pilot’s failure to maintain control due to spatial disorientation as a probable cause of the accident, with dark night as a factor.
No matter where you fly them, circling approaches carry risks. Some approaches have more curveballs than others, but the general rules still apply: plan your circling maneuver ahead of time, stay on top of the airplane, don’t go below MDA until on final, be ready for steeper-than-standard bank angles, count on higher-than-normal descent rates on final approach—and have the missed approach procedure briefed and ready for action.
Email [email protected]


